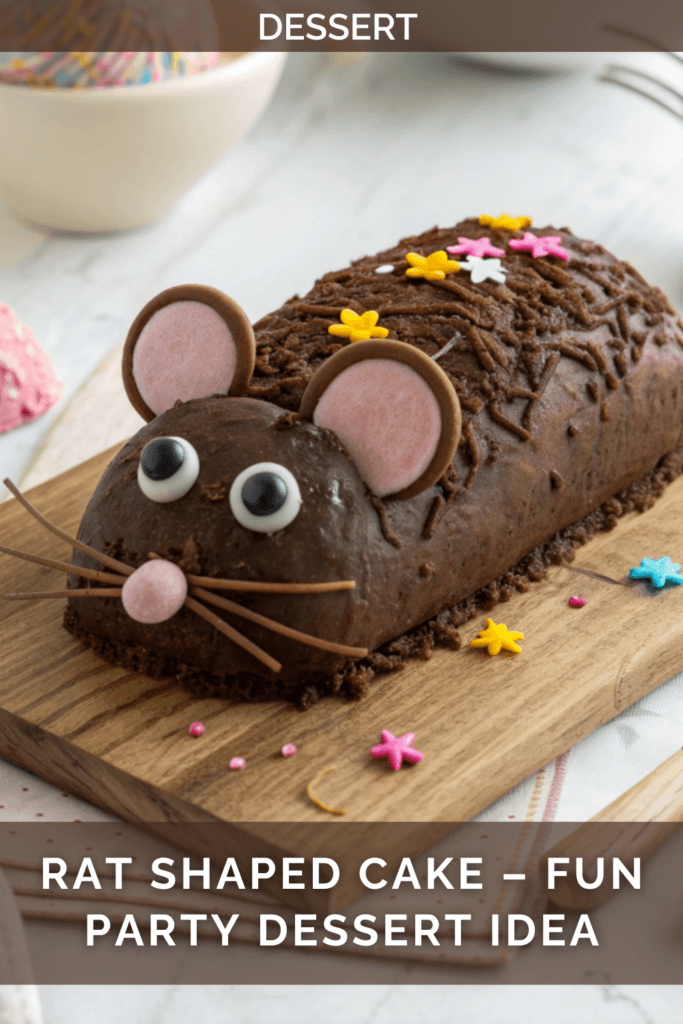
Rat-Shaped Cake Recipe :Simple 7-Step Decorating Guide
Introduction
Welcome, culinary enthusiasts! Today, we’re diving into the world of whimsical baking with a rat-shaped cake recipe novelty cake dessert easy party cake Halloween baking tutorial fun cake decorating ideas creative animal cake designs. This unique creation is sure to be the centerpiece of your next gathering, whether it’s a Halloween party or a quirky birthday celebration. Let’s embark on this delicious adventure together!
Why is it Perfect for You?
This Rat-Shaped Cake is the ideal choice for those looking to add a touch of whimsy and surprise to their dessert table. It’s:
◾ Eye-catching and conversation-starting
◾ Customizable to suit various occasions
◾ A fun project for bakers of all skill levels
◾ Perfect for Halloween or themed parties
◾ A unique way to showcase your creativity
Ingredients List
◾ 2 round cakes (8-inch diameter)
◾ 1 cupcake
◾ 3 cups buttercream frosting
◾ 1 cup grey fondant
◾ 1/4 cup pink fondant
◾ 2 black licorice strings
◾ 2 candy eyes
◾ 1 small tube of black gel food coloring

Preparation Time and Servings
Prep Time: 30 minutes
Cook Time: 35 minutes (for cake baking)
Total Time: 2 hours (including cooling and decorating)
Servings: 10-12
Step-by-Step Instructions
Step 1: Bake the Cakes
Begin by baking two 8-inch round cakes and one cupcake using your favorite cake recipe or a boxed mix. Allow them to cool completely before proceeding to the next step. This is crucial for successful frosting and shaping.
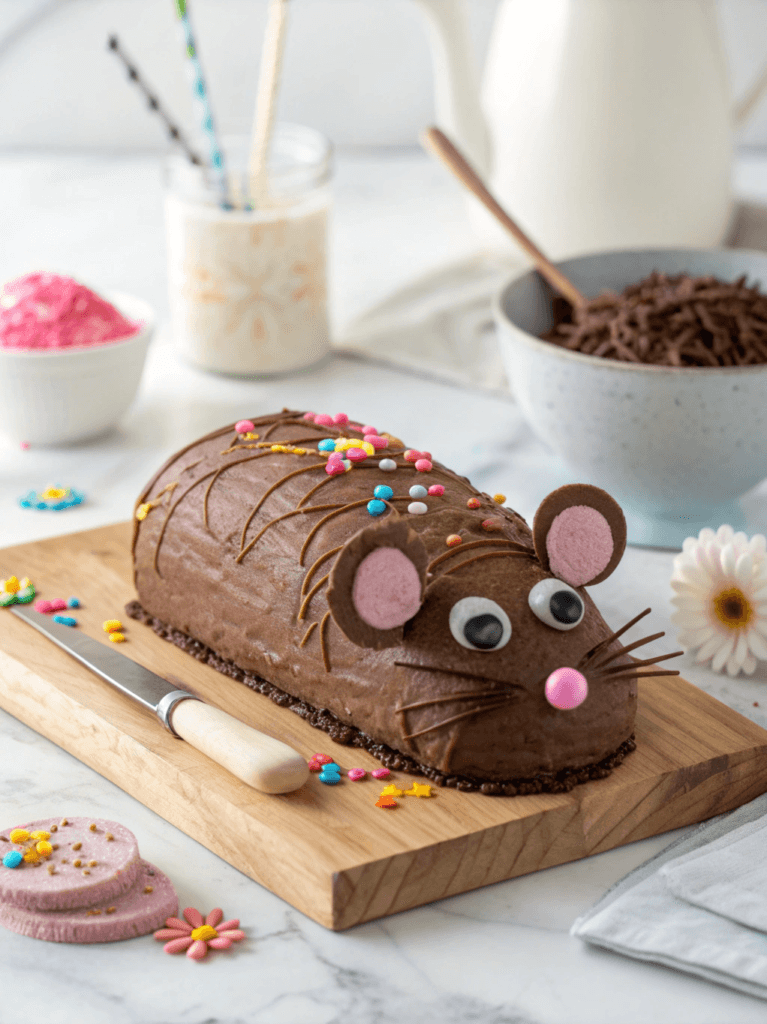
Step 2: Create the Rat’s Body
Once cooled, place one round cake on your serving platter. This will form the main body of the rat. Carefully cut the second round cake into a teardrop shape for the head, positioning it at one end of the body cake. Use buttercream frosting to secure the pieces together and fill any gaps.
Step 3: Add the Rear End
Take the cupcake and place it at the opposite end of the body to create a plump rear for your rat. Again, use buttercream to secure it in place and smooth the transition between the pieces.
Step 4: Crumb Coat and Chill
Apply a thin layer of buttercream frosting over the entire cake to seal in any crumbs. This is known as a crumb coat. Refrigerate the cake for about 15 minutes to set this layer.
Step 5: Apply the Final Coat
Once chilled, apply a thicker, even layer of buttercream frosting over the entire cake. Smooth it as much as possible to create a good base for the fondant.
Step 6: Cover with Fondant
Roll out the grey fondant and carefully drape it over the cake, smoothing it gently to cover the entire surface. Trim any excess fondant from the base of the cake.
Step 7: Add the Final Details
Use pink fondant to create ears, a nose, and paws. Attach the candy eyes and use the black gel food coloring to add whiskers and a mouth. Finally, insert the licorice strings into the rear of the cake to create a tail.
Nutritional Information
Please note that nutritional values may vary depending on the specific ingredients used.
◾ Total Fat: 15g
◾ Saturated Fat: 9g
◾ Cholesterol: 65mg
◾ Sodium: 200mg
◾ Total Carbohydrates: 50g
◾ Dietary Fiber: 1g
◾ Sugars: 35g
◾ Protein: 3g
Calories per Person
Approximately 350-400 calories per serving, based on 12 servings.
Healthier Alternatives for the Recipe
To make this Rat-Shaped Cake a bit healthier, consider:
◾ Using whole wheat flour in the cake batter
◾ Substituting applesauce for some of the oil or butter
◾ Opting for a Greek yogurt-based frosting
◾ Using natural food coloring alternatives
Serving Suggestions
Serve your Rat-Shaped Cake on a platter decorated with edible “cheese” made from yellow fondant or marzipan. Surround the cake with small cookies shaped like cheese wedges for an extra thematic touch.
Common Mistakes to Avoid
◾ Not allowing the cakes to cool completely before frosting
◾ Applying fondant to a warm or unstable cake
◾ Overworking the fondant, which can cause it to tear
◾ Forgetting to chill the crumb coat before final frosting
Storing Tips for the Recipe
Store your Rat-Shaped Cake in an airtight container in the refrigerator for up to 3 days. Allow it to come to room temperature for about 30 minutes before serving for the best flavor and texture.
FAQs
Can I use a different flavor of cake for this recipe?
Absolutely! The beauty of this Rat-Shaped Cake is that you can use any cake flavor you prefer. Chocolate, vanilla, or even red velvet would work wonderfully.
How far in advance can I make this cake?
For the best results, I recommend making the cake no more than 1-2 days in advance. This ensures the cake remains fresh and the fondant doesn’t dry out or crack.
Can I use buttercream instead of fondant for the grey covering?
While fondant provides a smoother finish, you can certainly use buttercream if you prefer. Just be aware that achieving the same level of detail might be more challenging.
Is this cake suitable for beginners?
Yes, this Rat-Shaped Cake is a great project for beginners. The steps are straightforward, and even if it’s not perfect, the charm is in its uniqueness!
Conclusion
Creating this Rat-Shaped Cake is not just about baking; it’s about unleashing your creativity and having fun in the kitchen. Whether you’re preparing for a Halloween party or simply want to surprise your guests with a unique dessert, this cake is sure to be a hit. Remember, perfection isn’t necessary – each Rat-Shaped Cake will have its own personality, just like real rats! So, roll up your sleeves, gather your ingredients, and get ready to create a dessert that’s both delicious and delightfully unexpected.
Contact Us
Contact us at [email protected] and we’ll get back to you as soon as possible.
Share your experience with us
OOLALA
This turned out so awesome they look like they came from a exspensive bakery.
Just a question
So what about the grease from the meat? Should I use the leanest meats or is the grease give more flavor.
What about a meatloaf on top of veggies ? Would that work?
Ingredients list good, directions lacking
There were great details on quantities of ingredients I should use, but the recipe didn’t tell me the cook time. Also, mentioned in the section about “common mistakes” that you need to let it chill enough but doesn’t direct you in the recipe that you need to let it chill. More details would be helpful
Dressing is perfect!
Not a big fan of mayo, loved the Greek yogurt swap. Reduced garlic a bit. Dressing was delish!
Best coffee cake- ever!!
This recipe was not the easiest to follow due to how it was written. It requires a lot of back and forth from instructions to the lists of ingredients but oh, hey, the end result is totally worth the effort! Mouthwatering and delicious plus it’s a pretty presentation.