Apple Cider Chicken Recipe Perfect Cozy Fall Dinner
Introduction
In my years spent in kitchens around the world, from bustling Parisian bistros to serene countryside inns, I’ve learned that the most memorable dishes are often born from the simplest, most honest ingredients. There is a certain magic that happens when you combine the crisp, sweet tang of autumn apples with the savory depth of perfectly seared chicken. This is the heart of my cherished Apple Cider Chicken recipe. It’s more than just a meal; it’s the culinary equivalent of a warm hug on a cool evening, a symphony of flavors that captures the very essence of the season. This dish is designed for ease and elegance, transforming humble ingredients into a spectacular one-pan dinner that tastes like it took hours to prepare. Ready to discover why this will become your go-to autumn masterpiece?
Why You’ll Love This Recipe
- A Symphony of Flavors: The dish beautifully balances sweet apple cider, tangy Dijon mustard, and aromatic herbs for a complex and deeply satisfying sauce.
- One-Pan Wonder: Cleanup is an absolute breeze as the entire meal comes together in a single skillet, making it perfect for busy weeknights.
- Elegantly Simple: With straightforward steps and accessible ingredients, you can create a restaurant-quality meal that is guaranteed to impress your family and friends.
- Perfectly Juicy Chicken: My technique ensures the chicken thighs are seared to a perfect golden-brown on the outside while remaining incredibly tender and moist inside.
Preparation Time and Servings
This is a wonderfully quick recipe that delivers maximum flavor with minimal effort, making it an ideal choice for a sophisticated weeknight dinner.
⏱️ Preparation Time: 15 minutes
🔥 Cooking Time: 30 minutes
⏰ Total Time: 45 minutes
💡 Difficulty: Easy
👥 Servings: 4 people
Ingredients List
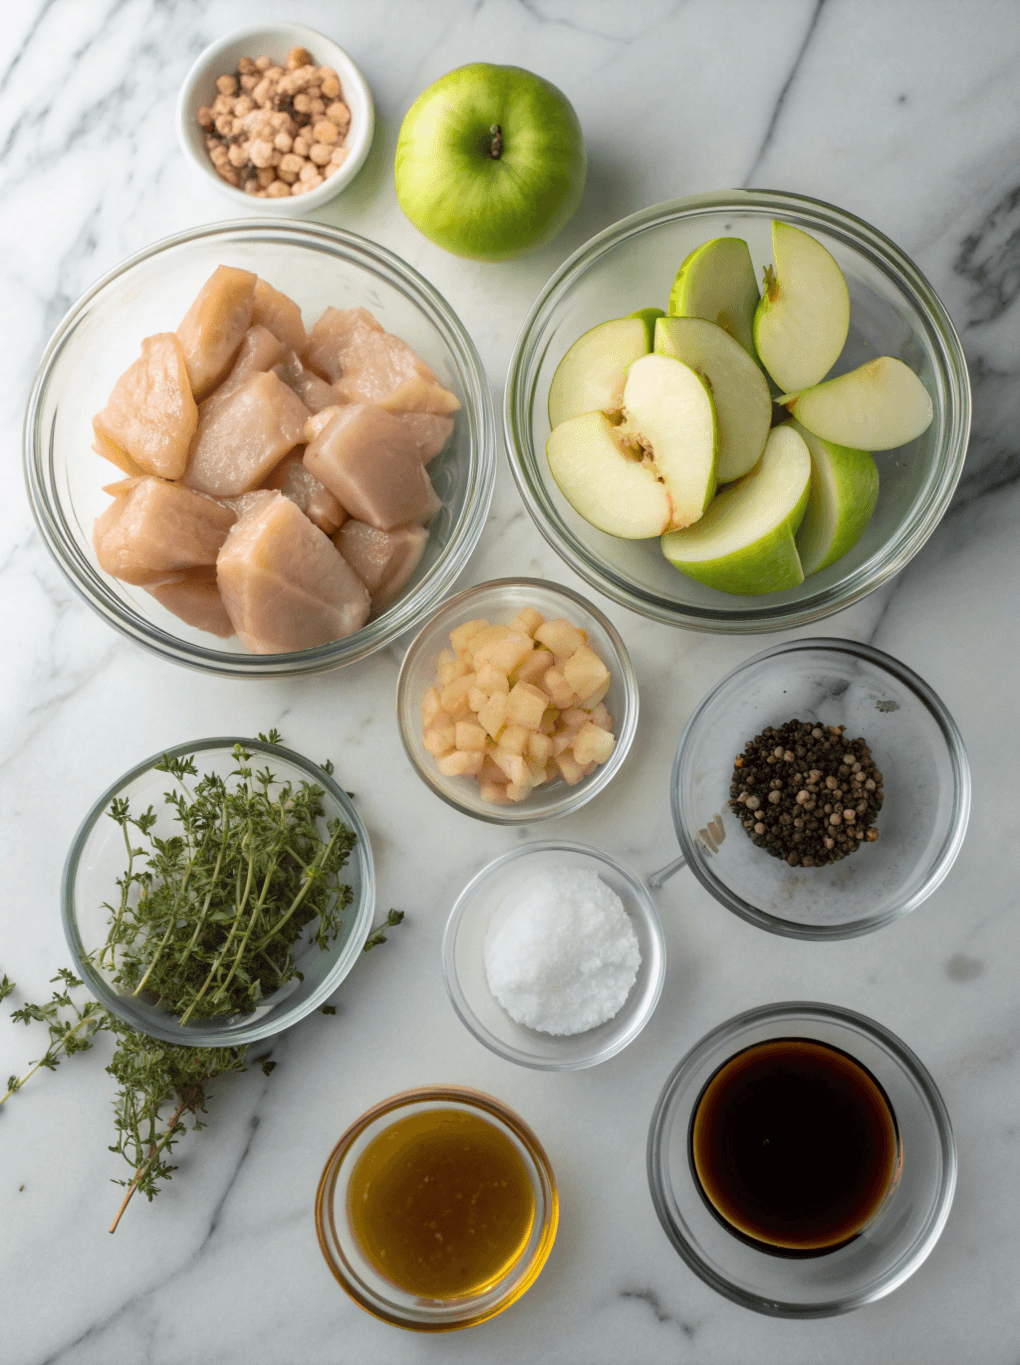
- 4 bone-in, skin-on chicken thighs (about 2 lbs / 900g)
- 1 tablespoon olive oil
- 2 medium shallots, thinly sliced
- 2 cloves garlic, minced
- 1 Honeycrisp or Gala apple, cored and thinly sliced
- 1 1/2 cups (360ml) good-quality unfiltered apple cider
- 1/4 cup (60ml) chicken broth
- 2 tablespoons apple cider vinegar
- 1 tablespoon Dijon mustard
- 1 teaspoon fresh thyme leaves (plus extra for garnish)
- 2 tablespoons unsalted butter, cut into small pieces
- Salt and freshly ground black pepper to taste
- 1 tablespoon fresh parsley, chopped for garnish
Step-by-Step Instructions
- Prepare the Chicken: Pat the chicken thighs completely dry with paper towels. This is a crucial step for achieving that perfectly crispy skin. Season generously on all sides with salt and pepper.
- Sear the Chicken: Heat the olive oil in a large, oven-safe skillet (cast iron is my preferred vessel) over medium-high heat. Place the chicken thighs skin-side down and sear for 5-7 minutes without moving them, until the skin is deeply golden-brown and crisp. Flip and cook for another 3-4 minutes on the other side. Remove the chicken from the skillet and set it aside on a plate.
- Sauté the Aromatics: Reduce the heat to medium. Add the sliced shallots to the skillet and cook in the rendered chicken fat for 2-3 minutes until softened. Add the minced garlic and sliced apples, cooking for another 2 minutes until the garlic is fragrant and the apples begin to soften slightly.
- Create the Pan Sauce: Pour the apple cider, chicken broth, and apple cider vinegar into the skillet to deglaze, scraping up any browned bits from the bottom of the pan with a wooden spoon—this is where the flavor lives! Bring the liquid to a simmer and let it cook for about 5 minutes, allowing it to reduce slightly.
- Combine and Simmer: Whisk in the Dijon mustard and fresh thyme leaves. Return the seared chicken thighs to the skillet, skin-side up. Reduce the heat to low, cover the skillet, and let it simmer for 15-20 minutes, or until the chicken is cooked through and the internal temperature reaches 165°F (74°C).
- Finish the Sauce: Remove the cooked chicken from the skillet once more. Bring the sauce back to a simmer and whisk in the cold butter pieces, one at a time, until the sauce is glossy and slightly thickened. Taste and adjust seasoning with more salt and pepper if needed. This final step gives your Apple Cider Chicken a luxurious, restaurant-quality finish.
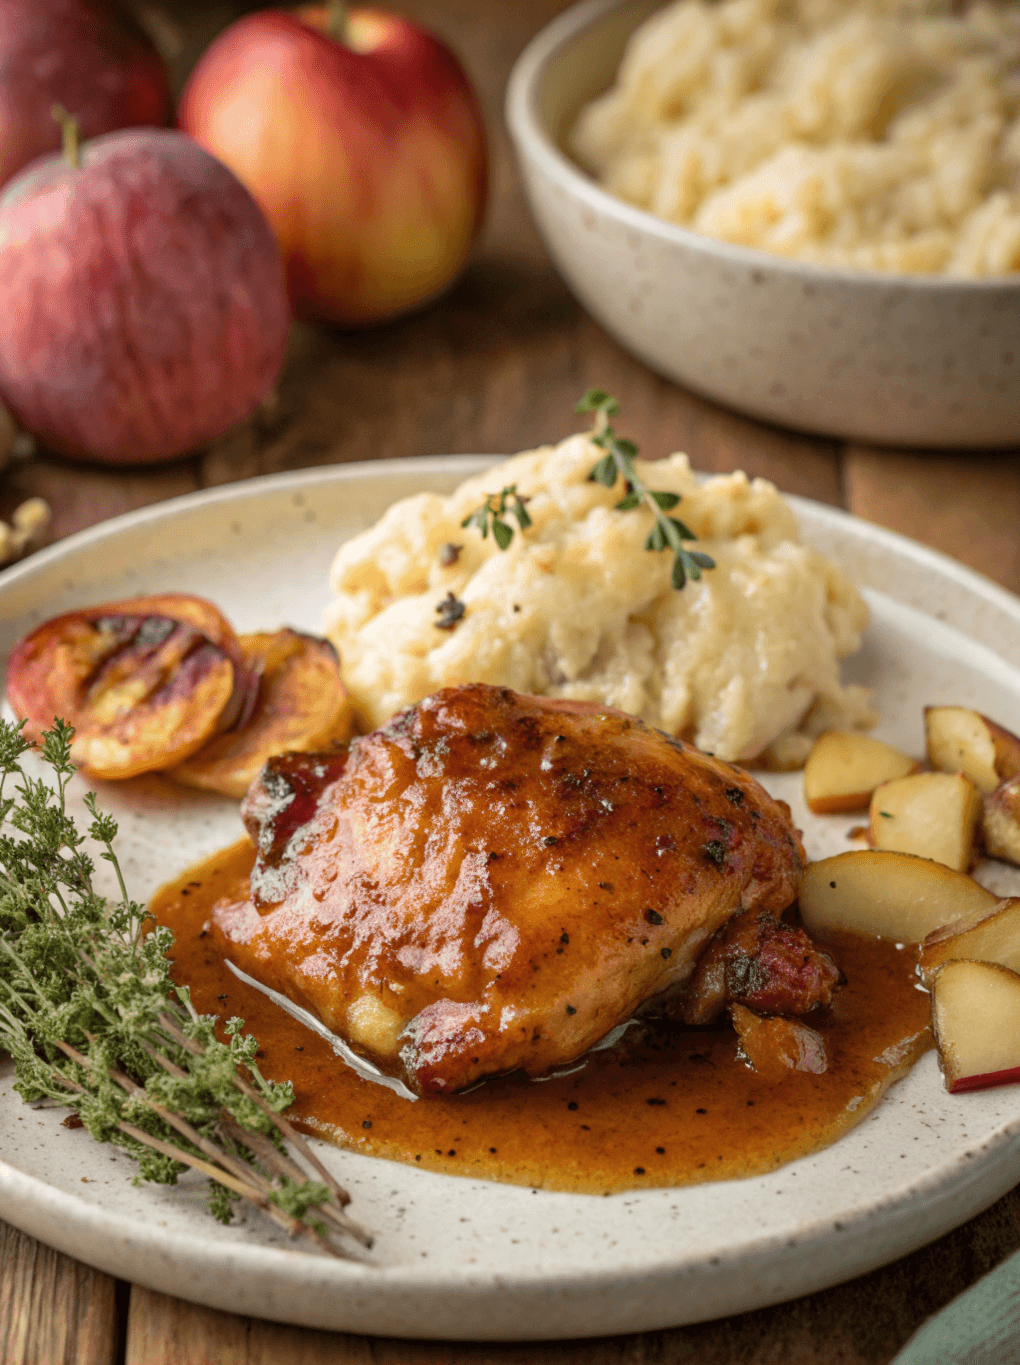
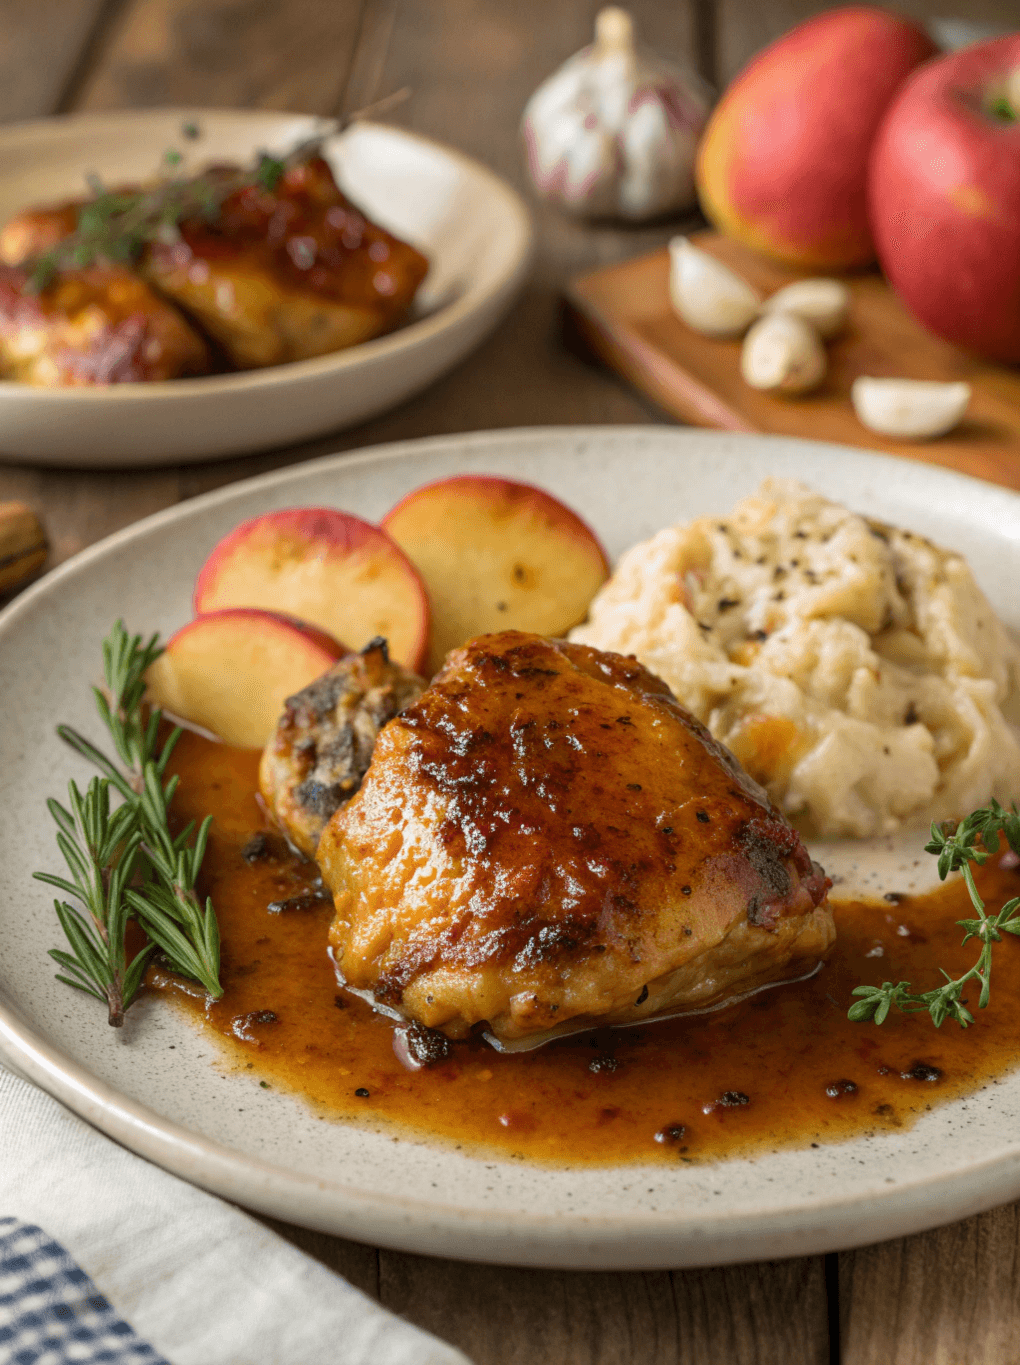
- Serve: Return the chicken to the skillet, spooning the glorious sauce over the top. Garnish with fresh parsley and thyme. Serve this magnificent Apple Cider Chicken immediately with creamy mashed potatoes, roasted vegetables, or a simple green salad.
Expert Tips for the Perfect Apple Cider Chicken
- Choose the Right Cider: For the best flavor, use a high-quality, unfiltered apple cider, not sparkling hard cider or apple juice. The unfiltered cider provides a deeper, more complex apple flavor that is essential for the sauce.
- Don’t Crowd the Pan: When searing the chicken, ensure there is enough space between each piece. Overcrowding the pan will steam the chicken instead of searing it, preventing you from getting that covetable crispy skin. Work in batches if necessary.
- Let the Chicken Rest: After cooking, allow the chicken to rest for a few minutes before serving. This allows the juices to redistribute throughout the meat, ensuring every bite is succulent and flavorful.
- Sauce Consistency is Key: If your sauce is too thin, you can let it simmer for a few extra minutes before adding the butter to reduce it further. If it becomes too thick, simply whisk in a splash more chicken broth until you reach the desired consistency.
Common Mistakes to Avoid
A few simple pointers from my kitchen to yours will ensure your dish is flawless every time.
- Not getting the pan hot enough – A screaming hot pan is essential for a good sear. This initial step locks in the juices and creates the crispy skin that makes this dish so delightful.
- Skipping the deglazing step – Those browned bits (the “fond”) at the bottom of the pan are concentrated flavor. Scraping them up when you add the cider is non-negotiable for a rich, deep sauce.
- Using low-quality cider – The flavor of your sauce is entirely dependent on the quality of your cider. Using thin, overly sweet apple juice will result in a one-dimensional sauce.
- Forgetting to pat the chicken dry – Moisture is the enemy of crispy skin. A simple pat-down with a paper towel makes all the difference between soggy and spectacular.
Storing Tips for the Recipe
This Apple Cider Chicken is just as delicious the next day. Here’s how to store it properly.
- Short-term storage: Let the dish cool completely before storing.
- Refrigeration: Store in an airtight container for up to 3-4 days. To reheat, place in a skillet over medium-low heat or in a 350°F (175°C) oven until warmed through. The sauce may need a splash of broth to loosen up.
- Freezing: I don’t typically recommend freezing this dish, as the texture of the sauce and apples can change upon thawing. It is best enjoyed fresh.
- Make-ahead option: You can sear the chicken and sauté the shallots and apples a day in advance. Store the components separately in the refrigerator, then combine and finish the simmering process just before serving.
Frequently Asked Questions (FAQs)
What kind of apples work best for Apple Cider Chicken?
You want an apple that holds its shape during cooking and offers a balance of sweet and tart flavors. I highly recommend Honeycrisp, Gala, Braeburn, or Fuji apples. Avoid varieties like Red Delicious, which can become mushy when cooked.
Can I use boneless, skinless chicken for this recipe?
Absolutely. You can substitute boneless, skinless chicken thighs or breasts. Sear them for 3-4 minutes per side, then reduce the simmering time to 10-12 minutes, or until the chicken is cooked through. The bone-in, skin-on thighs provide more flavor and moisture, but the boneless version will still be delicious.
Conclusion
There you have it—a dish that truly embodies the comfort and elegance of autumn cooking. This Apple Cider Chicken recipe is a testament to how simple, quality ingredients can create an unforgettable meal. The balance of sweet, savory, and tangy notes makes it a sophisticated yet accessible dinner for any night of the week. Don’t forget to share this seasonal favorite with your friends and family. I invite you to try it and share your experience in the comments below!
Contact Us
Contact us at [email protected] and we’ll get back to you as soon as possible.
Share your experience with us
OOLALA
This turned out so awesome they look like they came from a exspensive bakery.
Just a question
So what about the grease from the meat? Should I use the leanest meats or is the grease give more flavor.
What about a meatloaf on top of veggies ? Would that work?
Ingredients list good, directions lacking
There were great details on quantities of ingredients I should use, but the recipe didn’t tell me the cook time. Also, mentioned in the section about “common mistakes” that you need to let it chill enough but doesn’t direct you in the recipe that you need to let it chill. More details would be helpful
Dressing is perfect!
Not a big fan of mayo, loved the Greek yogurt swap. Reduced garlic a bit. Dressing was delish!
Best coffee cake- ever!!
This recipe was not the easiest to follow due to how it was written. It requires a lot of back and forth from instructions to the lists of ingredients but oh, hey, the end result is totally worth the effort! Mouthwatering and delicious plus it’s a pretty presentation.