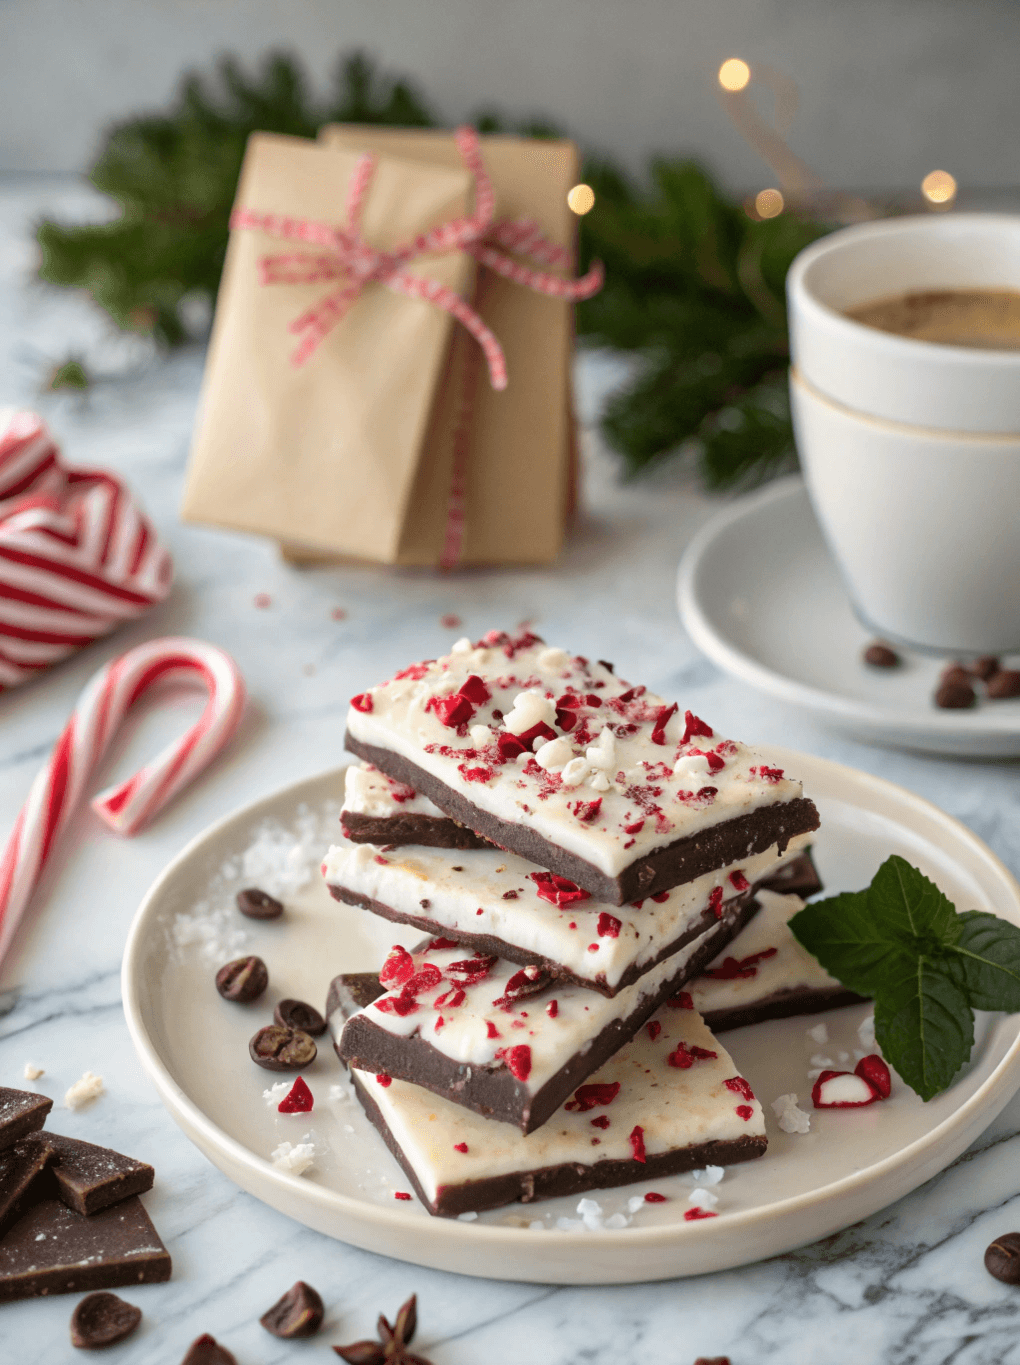
Salted Peppermint Bark: The Best Easy Recipe to Make
Introduction
In my years spent in the world’s most demanding pastry kitchens, I learned one profound truth: the most memorable creations are often born from the elegant dance of simplicity and contrast. I recall one winter in Paris, experimenting with the stark, beautiful bitterness of dark chocolate. It was there I discovered that a whisper of salt and a bright spark of peppermint could transform a simple confection into an experience. This is the very essence of my recipe for Salted Peppermint Bark. It is not merely a holiday treat; it is a study in texture and taste-a crisp, cool layer of white chocolate and crushed peppermint over a deep, rich base of dark chocolate, all unified by a final flourish of flaky sea salt. This is more than a recipe; it’s a technique for creating pure holiday magic. Let me guide you through the simple steps to craft this masterpiece in your own kitchen.
Why You’ll Love This Recipe
- A Symphony of Flavors and Textures: The combination of rich dark chocolate, sweet white chocolate, cool peppermint, and a hint of salt creates an incredibly sophisticated and addictive flavor profile.
- Deceptively Simple to Create: Despite its gourmet appearance, this recipe requires no special equipment or advanced techniques, making it perfect for chefs of all skill levels.
- The Perfect Edible Gift: Beautifully packaged, this Salted Peppermint Bark makes an elegant and thoughtful homemade gift for friends, family, and colleagues during the festive season.
- Endlessly Customizable: This recipe serves as a perfect canvas. Feel free to experiment with different types of chocolate or even add a swirl of color for a personal touch.
Preparation Time and Servings
This gourmet treat comes together in a flash, making it an ideal recipe for busy holiday schedules. The majority of the time is hands-off, letting the refrigerator do the work.
⏱️ Preparation Time: 15 minutes
🔥 Melting Time: 5 minutes
⏰ Total Time: 1 hour 20 minutes (includes chilling)
💡 Difficulty: Easy
👥 Servings: 12-16 people
It’s a quick, 20-minute active time recipe that delivers stunning results every single time.
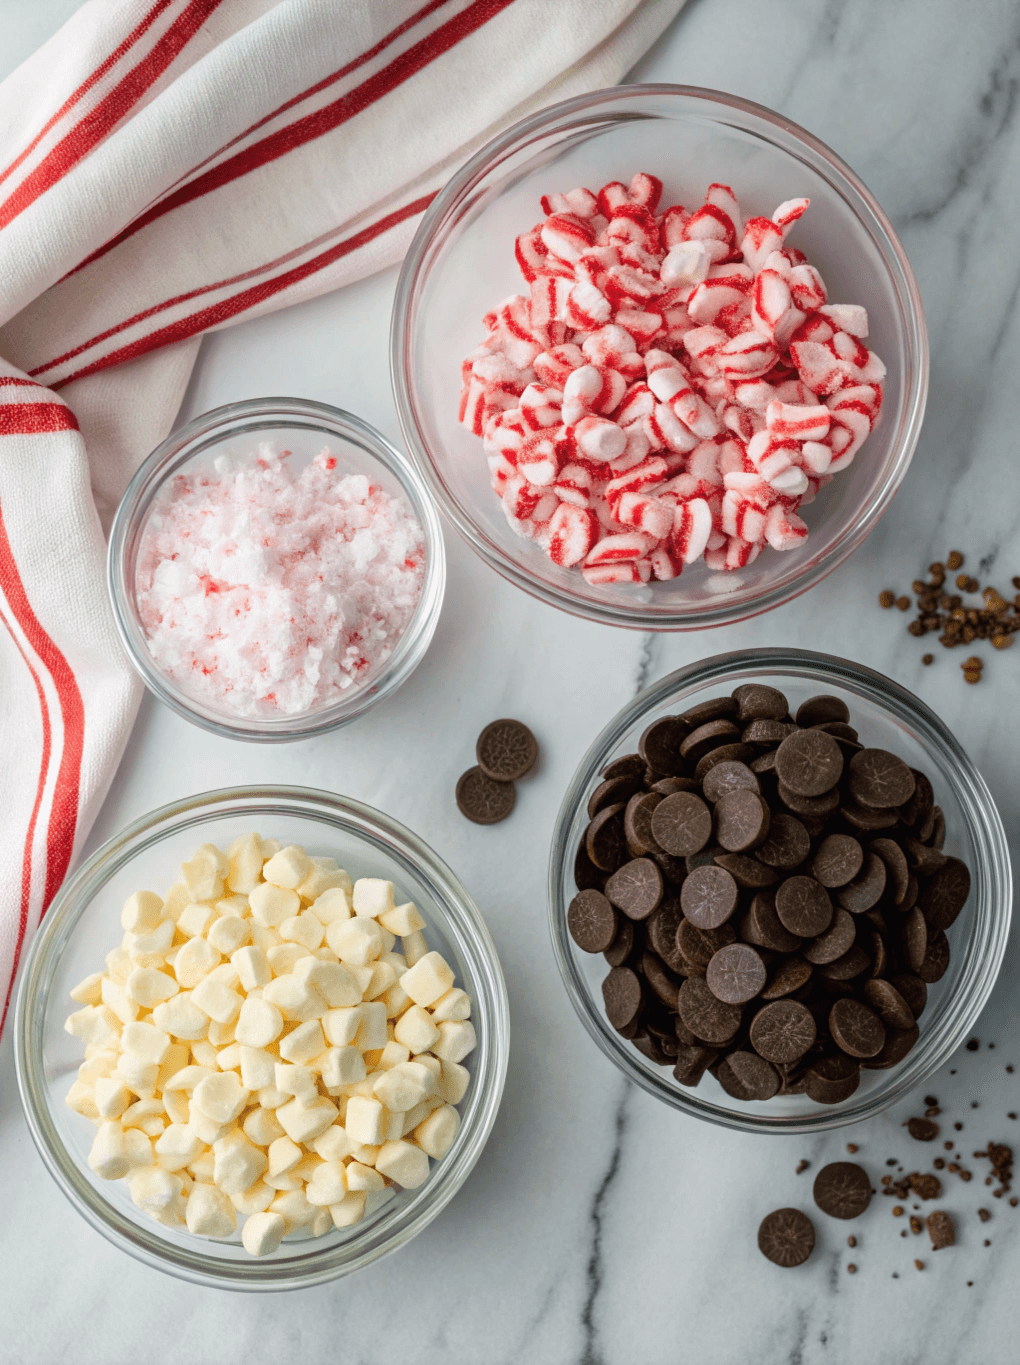
Ingredients List
- 12 ounces (340g) high-quality semi-sweet or bittersweet chocolate wafers (at least 60% cacao)
- 12 ounces (340g) high-quality white chocolate wafers (at least 28% cocoa butter)
- 1 teaspoon pure peppermint extract, divided
- 1/2 cup (75g) crushed candy canes or peppermint candies, divided
- 1/2 teaspoon flaky sea salt (like Maldon or Fleur de Sel)
Step-by-Step Instructions
- Prepare Your Pan: Line a baking sheet (approximately 9×13 inches) with parchment paper, leaving a slight overhang on the sides. This will make it much easier to lift the finished bark out of the pan.
- Melt the Dark Chocolate: Using a double boiler or a heatproof bowl set over a saucepan of simmering water, melt the semi-sweet chocolate wafers, stirring occasionally until smooth and glossy. You can also use a microwave in 30-second intervals, stirring between each, but be careful not to scorch it. Once melted, stir in 1/2 teaspoon of the peppermint extract.
- Create the First Layer: Pour the melted dark chocolate onto the prepared baking sheet. Use an offset spatula to spread it into a thin, even layer across the entire surface. Place the pan in the refrigerator for about 20-25 minutes, or until the chocolate is just set but still slightly tacky to the touch.
- Melt the White Chocolate: While the first layer is setting, clean your bowl and melt the white chocolate wafers using the same method as before. White chocolate is more delicate, so be especially gentle with the heat. Once completely smooth, stir in the remaining 1/2 teaspoon of peppermint extract.
- Create the Second Layer: Retrieve the pan from the refrigerator. Pour the melted white chocolate over the set dark chocolate layer and spread it evenly with your offset spatula, working quickly so the layers meld perfectly.
- Garnish and Set: Immediately sprinkle the top with the crushed candy canes and the flaky sea salt. Gently press the toppings into the white chocolate with your hands. Return the pan to the refrigerator for at least 1 hour, or until the entire sheet of Salted Peppermint Bark is completely firm.
- Break and Serve: Once firm, lift the parchment paper out of the pan. Break the bark into irregular, rustic pieces with your hands or use a sharp knife for more precise cuts. Your beautiful Salted Peppermint Bark is now ready to be served.
Expert Tips for Success
- Choose Quality Chocolate: The final product is only as good as its ingredients. Use high-quality chocolate “callets” or wafers designed for melting, not chocolate chips, which contain stabilizers that can affect the texture.
- Avoid Water at All Costs: Even a single drop of water can cause your melting chocolate to “seize,” turning it into a grainy, unusable paste. Ensure all your bowls and utensils are perfectly dry.
- The Perfect Sprinkle: For the best visual appeal and flavor distribution, reserve some of the finest crushed peppermint dust to sprinkle on last. It fills in the gaps between the larger candy pieces beautifully.
- Master the Layers: The key to preventing the layers from separating is ensuring the bottom layer is firm but not rock-hard and cold. A slightly tacky surface allows the top layer to adhere properly, creating a perfect bond for your chocolate bark.
Common Mistakes to Avoid
Even the simplest recipes have nuances. Avoid these common pitfalls for flawless results:
- Seizing the Chocolate: This happens when melted chocolate comes into contact with water. Always use completely dry utensils and bowls to maintain a smooth, liquid consistency.
- Overheating the Chocolate: Melting chocolate low and slow is paramount. Rushing the process with high heat can scorch it, giving it a burnt taste and a clumpy texture.
- Impatient Layering: Pouring the warm white chocolate onto a dark chocolate layer that is not yet set will cause them to swirl together. Conversely, pouring it onto a layer that is frozen solid can cause separation. The timing is crucial.
- Skipping the Parchment Paper: This simple step is non-negotiable. It ensures you can easily remove the bark for breaking and prevents a frustrating cleanup scenario.
Storing Tips for the Recipe
To preserve the pristine snap and flavor of your creation:
- Short-term storage: Store in an airtight container at a cool room temperature (away from sunlight or heat sources) for up to 1 week.
- Refrigeration: For longer freshness, you can refrigerate it in an airtight container for up to 3 weeks. Let it sit at room temperature for a few minutes before serving for the best texture.
- Freezing: This Salted Peppermint Bark freezes exceptionally well. Place it in a freezer-safe bag or container, with layers separated by parchment paper, for up to 3 months.
- Make-ahead option: The entire recipe can be made up to two weeks in advance and stored in the refrigerator, making it a stress-free option for holiday planning.
Your Salted Peppermint Bark Questions Answered (FAQs)
Why did my chocolate layers separate after breaking?
This is the most common issue and it usually happens for one of two reasons. Either the bottom dark chocolate layer was too cold and hard when the white chocolate was poured over it, preventing them from bonding, or there was a thin layer of condensation on the dark chocolate. Ensure the first layer is just set-firm to the touch but not icy cold from the freezer.
Can I use milk chocolate instead of dark or semi-sweet?
Absolutely. You can customize the chocolate to your preference. Using milk chocolate will result in a sweeter, creamier bark. For a truly decadent experience, you could even do a layer of milk chocolate and a layer of dark chocolate. The technique remains the same, so feel free to experiment!
Conclusion
This recipe transforms a few simple ingredients into an elegant confection that rivals any boutique chocolatier. The balance of deep chocolate, cool mint, and sharp sea salt makes this Salted Peppermint Bark recipe an unforgettable holiday staple. It is a masterpiece of simplicity and flavor. I urge you to try it, and do not forget to share this Chocolate Bark with your friends and family!
Contact Us
Contact us at [email protected] and we’ll get back to you as soon as possible.
Share your experience with us
OOLALA
This turned out so awesome they look like they came from a exspensive bakery.
Just a question
So what about the grease from the meat? Should I use the leanest meats or is the grease give more flavor.
What about a meatloaf on top of veggies ? Would that work?
Ingredients list good, directions lacking
There were great details on quantities of ingredients I should use, but the recipe didn’t tell me the cook time. Also, mentioned in the section about “common mistakes” that you need to let it chill enough but doesn’t direct you in the recipe that you need to let it chill. More details would be helpful
Dressing is perfect!
Not a big fan of mayo, loved the Greek yogurt swap. Reduced garlic a bit. Dressing was delish!
Best coffee cake- ever!!
This recipe was not the easiest to follow due to how it was written. It requires a lot of back and forth from instructions to the lists of ingredients but oh, hey, the end result is totally worth the effort! Mouthwatering and delicious plus it’s a pretty presentation.